Gamma 2.2 setup or linear workflow |
| |
Please don't translate or copy these tutorials elsewhere. I don't like the tutorials to float around in 10 different versions and places on the net. Feel free to link to this page of course! (see also Terms of Use) |
|
|
Before you start
This tutorial was created with Vray version 3.0, but all settings are very similar in version 2.0.
First learn 3D Studio Max, then start with Vray. It is an extension to 3DS Max, not a replacement! For example things like the material editor, creating and manipulating objects, modifiers etc should all be familiar before trying to learn Vray. |
|
 |
UPDATE FOR VRAY 3.0!
This tutorial is based on the original gamma 2.2 tutorial which is now really outdated. 3dsMax and V-ray now use gamma 2.2 setup by default! Still, there are a few things you should know, which is what this new tutorial is all about.
You can find the original tutorial here, if you want to learn more about the original problem and how it was solved in 2005. |
What's it all about?
Back in 2004, some great people started a thread on the V-ray forums about 'working in linear space'. The thread almost exploded, and many people tried to understand what seemed to be a very complex workflow to get better looking images.
The base problem was simple. Vray and 3ds Max do their calculations in 'linear space'. The vray camera has a 'linear' response to light. This means that it is working in 'gamma 1.0 space'. All this is no problem, but since 3dsMax and Vray are set up to work in gamma 1.0 space, it also assumes that you view the output on a device that has a linear curve or gamma 1.0.
However your computer monitor is not gamma 1.0 at all. Since we didn't tell max and vray about this, our images are actually displayed much darker! |
Gamma 1.0 vs. Gamma 2.2
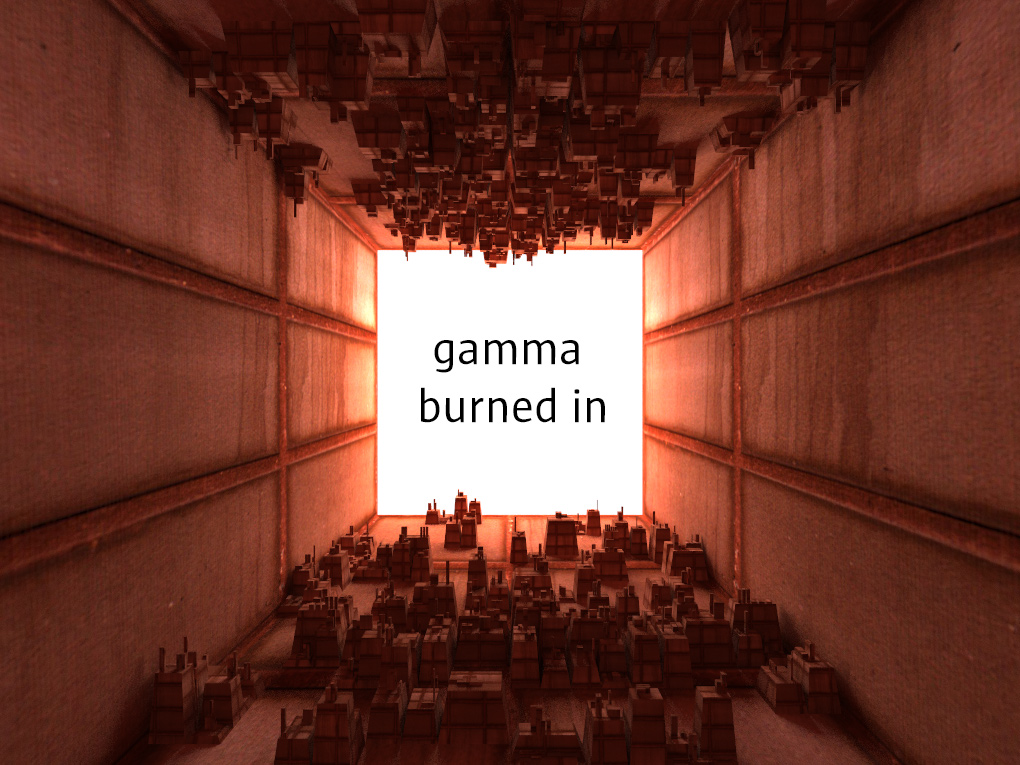
Here's a simple example: an interior with one very big opening where bright light can enter the room. On the left is the result without gamma 2.2 setup. The scene is very dark, and if you would like to brighten it up you'd have to increase the light strength, resulting in even more blown out areas around the window opening.
On the right is how V-ray and 3dsMax are setup now by default with gamma 2.2, resulting in a much brighter image, more like you would expect the light to behave in a scene like this.
|
HDRI and gamma
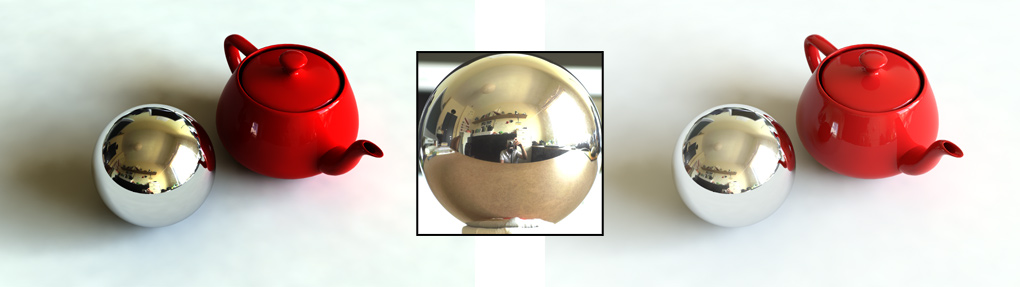
Another common problem was HDRI lighting and reflections. This example shows how obvious it was that the 'new' gamma 2.2 method was the way to go.
On the left again the 1.0 method, clearly showing that there was way too much contrast in lighting and reflections. This doesn't match with the lighing found in the original hdri map (middle).
On the right you can see that the reflection in the chrome ball is almost identical to the original hdri, and also lighting is much more natural.
|
Washed out textures, colors and low contrast lighting
One issue that came up, was that many converted scenes suddenly looked washed out, they lacked contrast. The reason for this is that when setting up a gamma 2.2 scene, you also have to select your colors in this gamma 2.2 space.
The same goes for textures. All textures are actually already setup to be viewed on your gamma 2.2 monitor. So if you now apply another gamma 2.2 curve to it inside 3dsMax, they will be double corrected and look way too bright.
This is why you had to setup 3dsMax's interface and bitmap loading properties correctly, so you can choose colors that will match your final output, and load textures with the correct gamma interpretation.
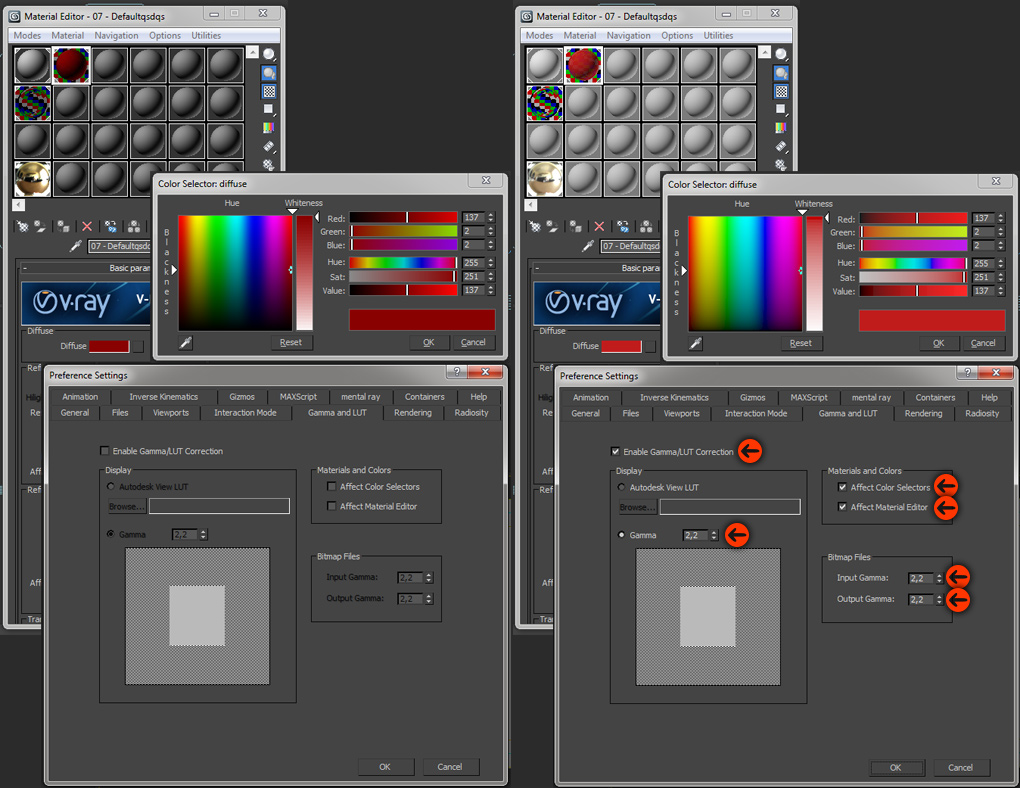
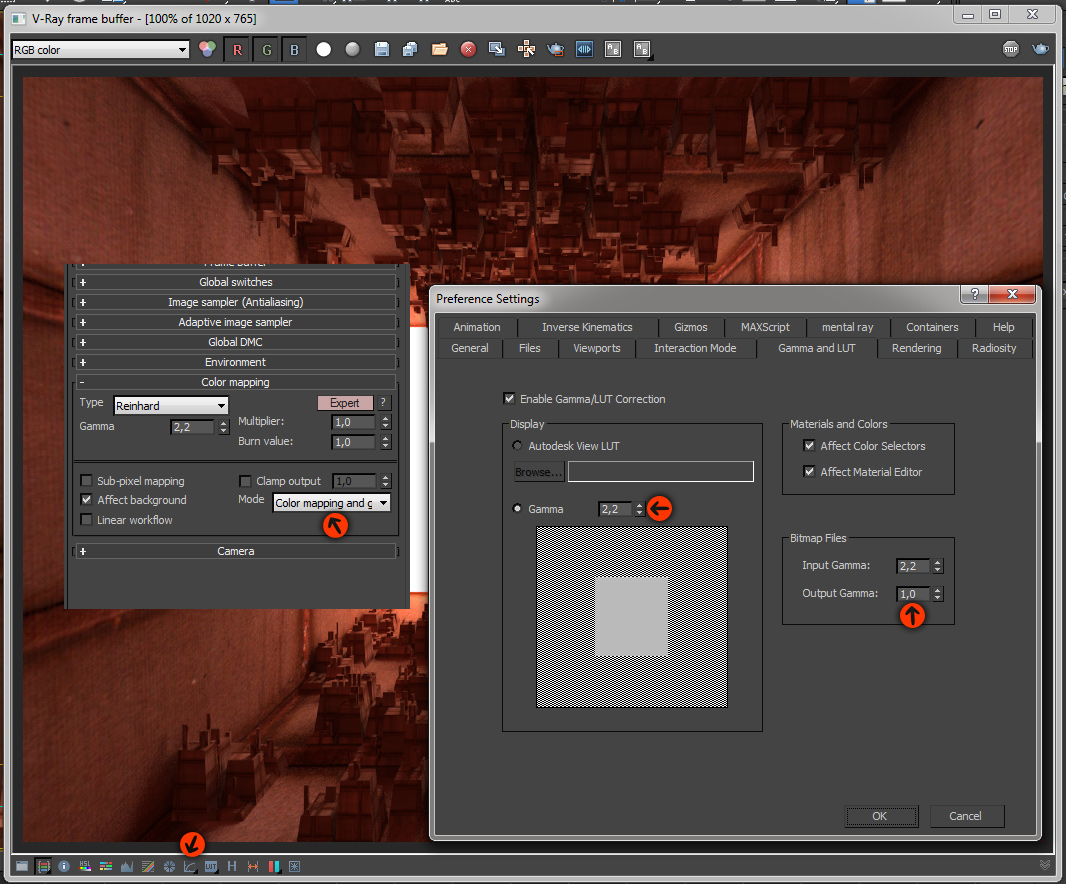
Below is a comparison of the old 3dsMax settings and the new defaults. Again on the left is the old setup, where no correction is applied, and on the right is the gamma 2.2 setup.
You are changing several things:
- Enable gamma/LUT correction: this enables this whole section
- Gamma: specify the gamma you want to work with. Most common is 2.2
- Materials and colors: Here you specify that you want the color selectors and material editor should also be displayed with gamma 2.2. This is very important, so you are choosing colors that will match your final output!
- Bitmap files input gamma: Here you specify that all loaded textures are ready for gamma 2.2, to make sure that they don't get double corrected and look washed out in your render.
- Bitmap files output gamma: This setting controls how images are saved, more on this later in this tutorial.
Take a look at the material editor and color swatches, how they got brighter. So if you want the same deep red for the teapot in the new gamma 2.2 scene, you should also choose a deep red in the now corrected color selector.
|
Virtual frame buffer - sRGB button
So, all the above was just to make sure you are choosing colors correctly, and that you load your textures correctly.
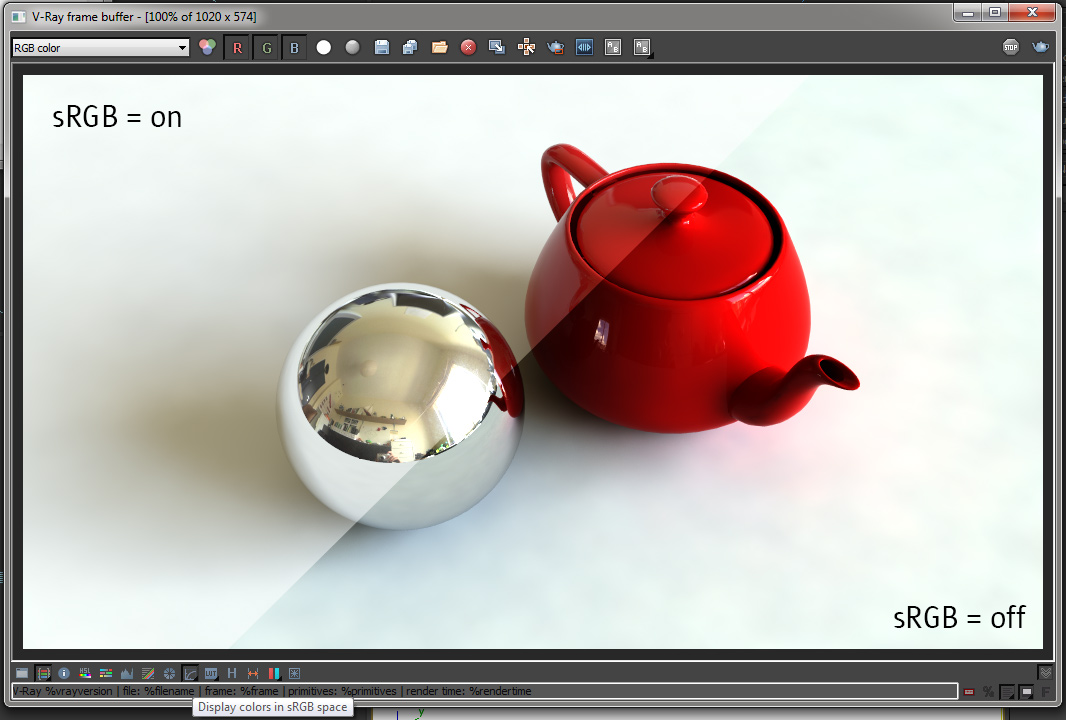
In the V-ray virtual frame buffer, there is a tiny button which is pressed by default: sRGB button. This button applies a gamma 2.2 curve to the VFB, so it displays your image as gamma 2.2 corrected, it doesn't actually burn the gamma curve into the image.
Below you can see the effect of the button. When unpressed, it displays the image again without correction, so it looks dark and wrong as before.
|
Saving images from the virtual frame buffer
To save your image correctly, we go back again to the 3dsMax preferences. Remember the output gamma setting? This is set to 2.2 by default, which is very important!
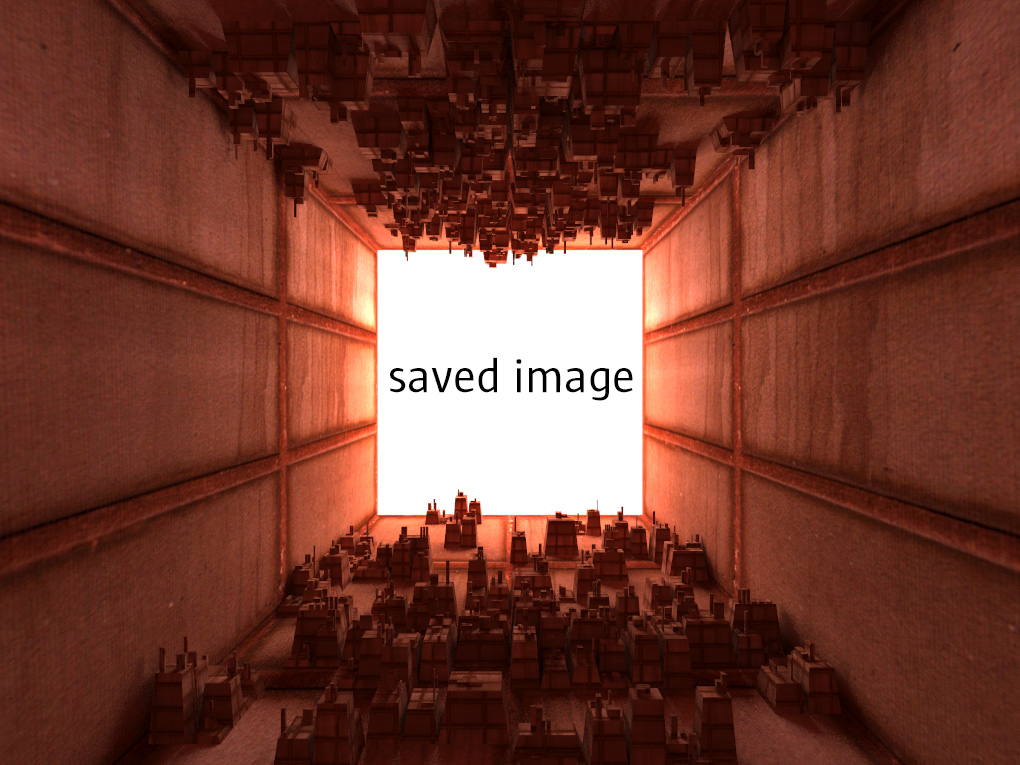
Since the sRGB button is also just a preview tool, we need to make sure that while saving the image, you apply this gamma 2.2 to the actual pixels in the image, otherwise when you view the saved image in an image viewer, it will simply look too dark again (because the gamma 2.2 curve wasn't burned into the image).
But this is where the problems start... The sRGB button applies a curve to display the image correctly. But is this the exact same curve as 3dsMax applies while saving the image? The answer is NO! Altough the difference is small, it is not 100% the same.
Hover your mouse over the image below to switch between the saved image with 3dsMax output = 2.2 and a screenshot taken from the Vray frame buffer. As you can see, the saved image is a bit brighter overal, proving that the sRGB curve is not the same as the 3dsMax gamma 2.2 curve.
|
Saving images from the virtual frame buffer - full float EXR
In a true linear workflow, you would also save your images as full float 32bit images, for example EXR. True linear workflow means that you setup all your programs to correctly display these linear images. So your image never gets the gamma or sRGB curve burned in, it is only displayed with such a curve in your software package (for example after effects or photoshop).
When saving an EXR, the output gamma is also not burned in. However I found some mixed results in this regard. Sometimes when I open a full float exr in photoshop it gets double corrected, sometimes it is displayed correctly.
In the case below, photoshop read the image correctly, and this time, it looked 100% identical as the screenshot from the VFB inside 3dsMax. Hover over the image below to compare.
|
Gamma 2.2 setup without true linear workflow
What if you don't want to save your image in full float format all the time? A true linear workflow is usefull for people who will use the full potential of these images to further post process them, for compositing needs etc...
Many people however will do just fine with a saved image where the gamma curve does get burned in while rendering the image, so you don't have to worry about getting the exact same output gamma curve while saving the image.
To achieve this, you need to go to one more setting in V-ray that controls this whole gamma thing: the color mapping rollout.
You will need to switch on 'expert' mode to see all the settings. As you can see, the gamma is set correctly to 2.2.
But what about this 'mode' dropdown? By default, this is set to 'color mapping only (no gamma)'. This means that no gamma curve gets burned in, the pixel values won't actually change while rendering. As we've seen, the image is displayed correctly because of the sRGB button.
But if this gamma 2.2 isn't applied here, what does this mode do to our image? Well, if you would turn it off, by choosing the 'none (don't apply anything)' mode, you will get an image that is almost identical... The only difference is, that you will get slightly worse noise and GI quality.
Reason for this is that V-ray is doing all kinds of image sampling based on some algorythms that try to identify to what extent more sampling is needed or not (to clear noise for example). When it is sampling very dark regions, it will stop sampling quite early, as the noise isn't very obvious in these regions. But as we've seen, the actual image is quite dark, it is just displayed brighter because of the sRGB button. So when you choose the 'none' mode, Vray is actually doing it's sampling on a very dark image. If you choose the 'color mapping only' mode, it is doing its sampling on the brighter image, but only the sampling, the gamma will not be applied to the actual pixels.
So, the only remaining mode 'color mapping and gamma' is doing both: it does the sampling on the bright image, AND it burns in the gamma curve. But as I said earlier, because the gamma is burned in, you need to disable the sRGB button or else it will get double corrected.
But because now the gamma curve is burned in already inside vray, we need to set the output gamma of 3dsMax back to 1.0, because otherwise it will apply its gamma curve AGAIN while saving out the image, and it will get double corrected.
Here's an overview of the settings you should use if you want to burn in gamma while rendering:
To make it a bit more complicated, here's a comparison between the image with the gamma burned in, and the saved EXR where no gamma was burned in. As you can see, this burned in gamma also looks a bit brighter.
Conclusion is that the sRGB curve is not the same as a gamma 2.2 curve. But in the case of gamma burned through color mapping, it doesn't matter, as you're never using the sRGB button. Your image viewed in the VFB will be exactly the same as your saved image.
|
Summary
The linear workflow/gamma 2.2 setup now is the default workflow for V-ray and 3dsMax. All recent renderers by the way use this approach. If you're new to Vray, you won't notice it that much, except when saving images to a non full float format, as then the curve applied while saving is not the same as the curve applied while viewing the image in the V-ray VFB, so you'll get slightly different looking images when saved.
The best solution, and the most professional one is to save out your images as EXR files. With these files, you'll also have the most control for further color corrections or compositing. This way you're working in true linear space.
A second solution is to apply gamma 2.2 through color mapping, and to turn off the sRGB button and save out the image without an extra gamma correction.
In my opinion, there is no right or wrong, use whatever method that suits you best!
Below are the settings for both approches: |
True linear space setup:
Here are all the setting for the most professional workflow, these are the defaults for V-Ray and 3dsMax:
|
Burn in gamma 2.2 setup
Here are all the setting if you want to burn in gamma during rendering:
|
Extra note: using RGB values from clients
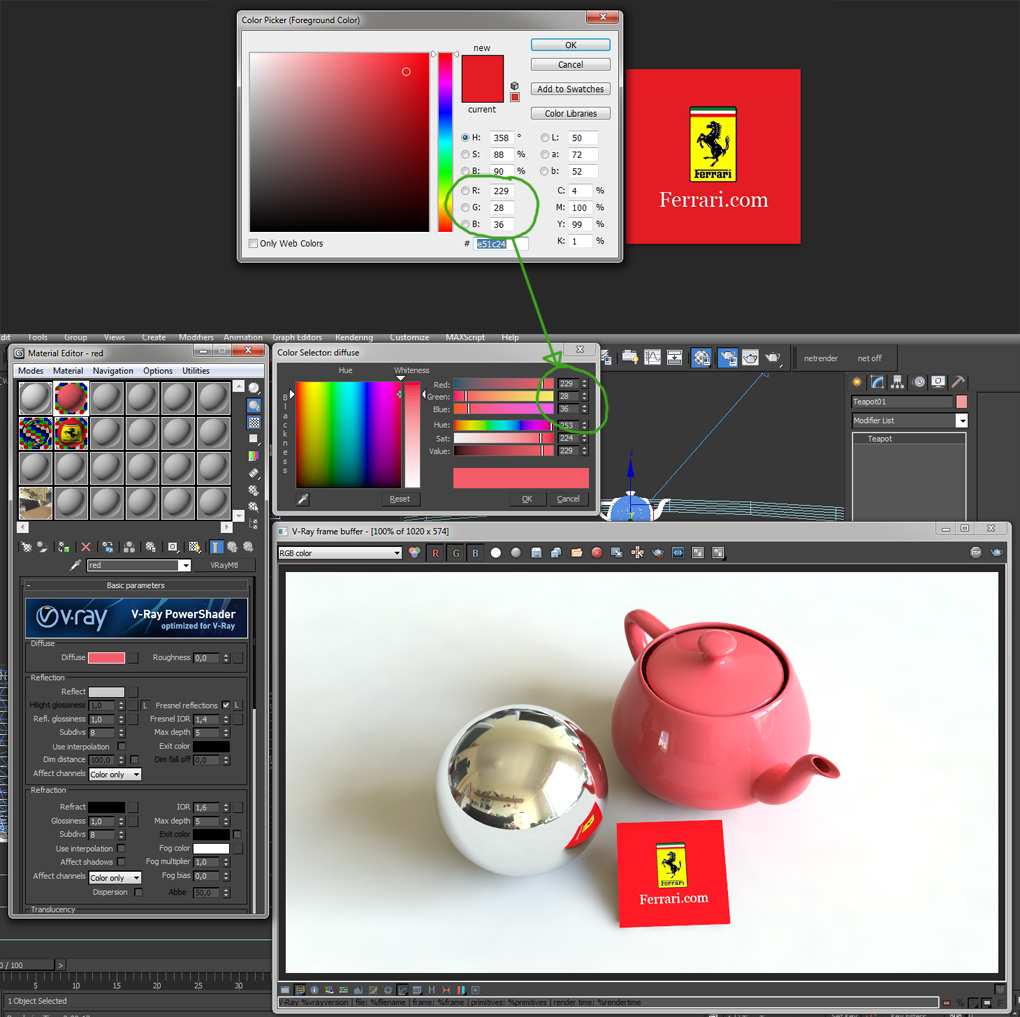
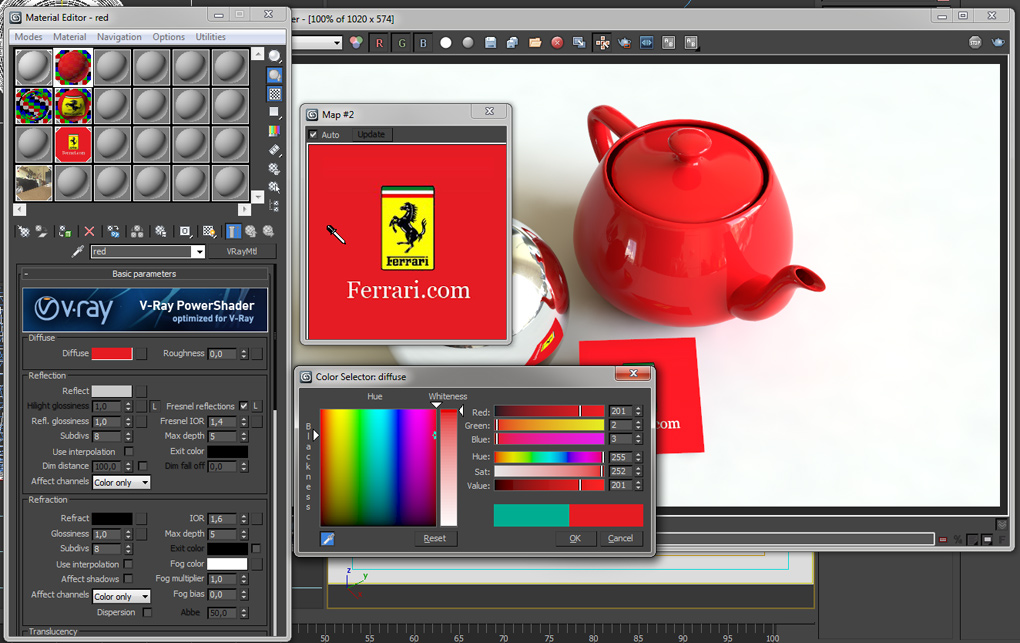
There's one more problem we didn't cover, and that's when you try to apply colors from a logo to a certain object in your scene. For example, you want to make the teapot the same red as the background of the Ferrari logo. So you take it into photoshop, use the eyedropper to sample the red and you write down the RGB values: 229,28,36.
Now you go in 3dsMax and change the red of the teapot to these exact values. As you can already see in the color selector, this looks more like pink than red. Also the render shows a pink teapot.
The problem is that max is setup to chose colors so they will look correct once rendered with a gamma 2.2 curve. Photoshop however is not, so you can't just copy these RGB values.
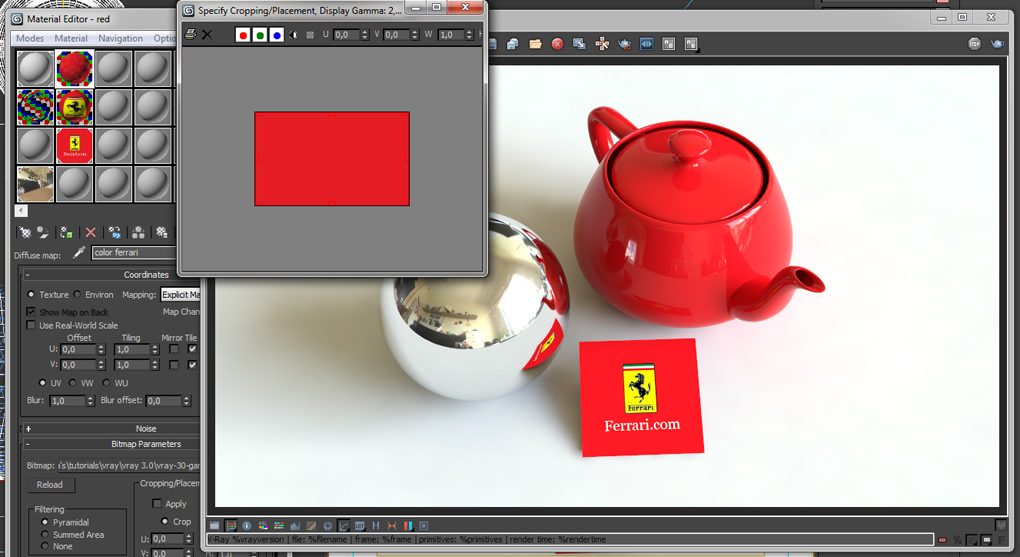
One approach is to take a small part out of the logo image, save it as a texture and apply this small texture to the diffuse channel of the material:
Or, place the texture in an empty slot of the material editor, double click it to open it up, and then in the teapot material diffuse color swatch use the eyedropper to sample a color from this logo texture: |
| Back to Vray tutorials page |
|
 |
|