The importance of true high dynamic range in hdr images |
| |
Please don't translate or copy these tutorials elsewhere. I don't like the tutorials to float around in 10 different versions and places on the net. Feel free to link to this page of course! (see also Terms of Use) |
| |
 |
Buying HDRI maps
Many people don't seem to realize that there is more to a HDRI map than only a pretty picture. Since you usually have to decide on buying HDRI maps from examining low dynamic range previews, it's important to know what to look for and how to spot bad quality maps.
This article will help you in doing just that, with a strong focus on the dynamic range which is usually overlooked, especially by the providers of HDRI maps.
|
What to look for when buying HDRI maps?
There are a lot of websites offering HDRI maps, but only a few offer really high quality and valuable maps. Here's a small overview of what to look for in a HDRI map:
- Dynamic range.
The most important thing is the actual dynamic range of the image. This is in fact what this article is about, so we'll get back to this topic later on. But first read about some other aspects of what makes a good HDRI stand out.
- Is the map useful for your renderings?
You don't want to render your brand new watch in a desert environment. And you don't want to render the latest concept car on a kitchen table. So think about what you want your environment to look like, so it fits the scene you will be rendering. Even if you will not be rendering your objects with the HDRI as a backdrop, the environment is important. It shows up in reflections and makes up your lighting, so rendering objects outside of their usual environment will look unnatural.
- Variation in HDRI bundles or collections.
Make sure that when you buy a complete collection, that there is some variation in the environments. Many collections contain dozens of maps from wide open exterior spaces. The clouds seen from hill X look the same as the clouds seen from hill Y, so there's no use in 15 maps from the same area on the same day. Same goes for city environments and even interiors. The following maps look different, but the effect on your rendering will only be small.
 - Contrast and light
A HDRI map is used for rendering reflections and realistic lighting. So that's what you want in your map: interesting features that will appear in your reflections, and nice lights that will bring your scene to life. So make sure you get a rendered preview of a scene lit with the specific hdri map, that's the only way you can see if it creates nice reflections and vivid lighting.
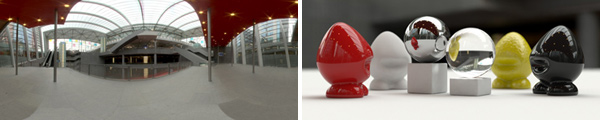
Usually what you want in a HDRI map is contrast. If there's contrast, it will show in the reflections on any material, even on rubber or slightly shining plastic. Also check out the light sources: how many, what colors, how big, where are they placed, etc...
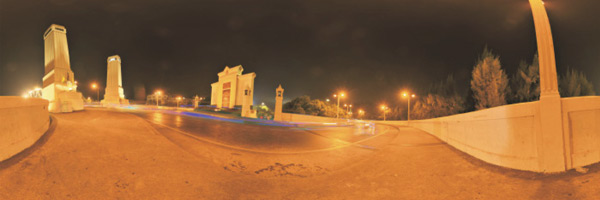
Here's an example of a HDRI map with lots of light sources, and very nice contrast. Next to it is a scene rendered with the same HDRI map, notice the nice reflections and lighting!
- Resolution vs sharpness.
Don't be fooled by some of the numbers... Higher doesn't always mean better quality! If the high resolution map is blurry, then the high resolution has no use.
The Aversis HDRI maps are sharp when viewed at 100%.
- Image quality.
Many maps are created with fisheye lenses, and have some stitching going on. So check if the maps have stitching problems. Some are even created with mirrored balls, which will lead to lots of artifacts like dust, scratches, wobbly lines, photographer in view, etc... Here's an example of wobbly lines (left) and dust or surface imperfections (right):
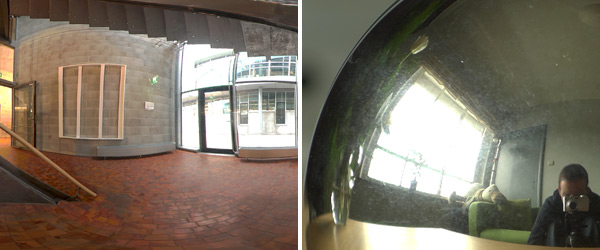
- Vertical lines.
Sometimes it will look like buildings are falling over, because the HDRI was not carefully shot or stitched. These types of artifacts should have been corrected in the stitching software, but most people don't pay much attention to it. Here's an example of verticals that are not corrected (also note the curved horizon):
|
What is the dynamic range of a HDRI map?
In fact the dynamic range is the difference between the darkest and the brightest pixel in your image. For example a HDRI map of a sunny environment, should have a very high dynamic range if you want the reflections and lighting to match the actual real life environment. The sun is ultra bright, and the darker regions (shadows) are very dark. In fact it is impossible with todays cameras to completely capture the dynamic range of a sunny scene. Even with the shortest exposure time, and smallest apertures, the sun will still be an overexposed point in your image (while the rest of your image will be black!).
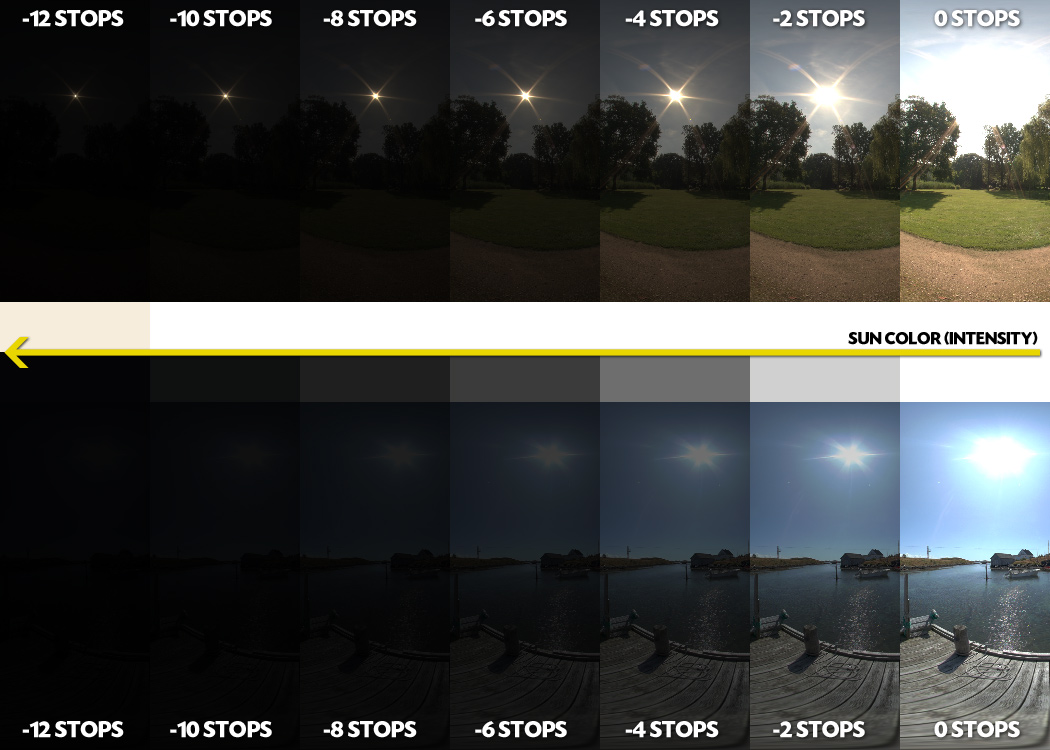
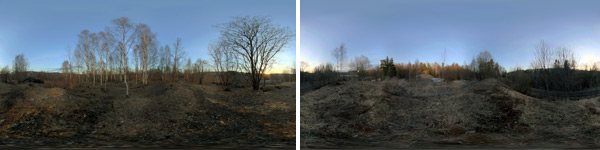
Many HDRI maps you can find on the web, don't capture the full dynamic range present in the real scene. Here's a comparison between 2 HDRI maps, both lowered in exposure equally:
A good hdri map will keep the light sources bright when lowering exposure, while all other pixels will go darker and darker. But as you can see in the bottom row, already after lowering exposure by two stops, the sun in the hdri starts to go from bright white to light grey...
Note the two bands of sun color in the middle. The top HDRI captures a lot more of the actual dynamic range. Only after lowering exposure by 12 full stops(!!!), the sun starts to change its intensity. Lowering the bottom hdri 12 stops results in a black sun color... |
Hu? EV's?
The dynamic range of a HDRI map is usually expressed in number of EV's or F-stops. EV stands for exposure value, and 1EV corresponds to one full stop of light on a camera. For example going from 1/400s exposure time to 1/200s, is going up one full stop, or 1EV.
The number of EV's is not directly related to the number of pictures that are used to create the HDRI map. Many cameras can also expose the image with 1/2 stops, or even 1/3 stops. So if you take 12 different exposures but with 1/3 stop interval, you capture in fact only 4 full stops or 4 EV's! This is very important to understand.
All this confusion results in many websites putting up random numbers next to their HDRI's as they please. So you cannot really trust these numbers, and you have to take the hdri into photoshop or something to really see the dynamic range you're dealing with.
As a guideline, you can use these values to make sure if the claimed numbers are correct or not:
- Sunny exterior scene
You're looking for 10 to 13 EV's. 13 EV's means for example going from 1/4000s to 1s of exposure time. In a sunny scene, 1s with a very small aperture will most certainly result in a very bright picture, so there is no use in shooting longer exposures as the scene will be completely blown out.
More EV's are possible with very high end cameras which are able to shoot very short exposure times.
- Interior scene
Here you will have even higher dynamic range, because indoor lights are a lot less bright than the sun, so todays cameras will be able to capture these light better. 17EV's is not an exception, which means going from 1/4000s to 8s of exposure.
So people claiming 25EV's or more are simply crazy, or not getting it right. If a HDRI has a lot smaller EV span, than you can be pretty sure it's not a really good HDRI map (regarding the dynamic range).
|
Dynamic range vs lighting & reflections
You might wonder what the problem is with bad dynamic range in HDRI maps. As said earlier, when you don't capture the full range, you're in fact not capturing the exact lighting situation of the real environment. So this will most likely translate into your 3D rendered scene, resulting in a bad match with the real scene.
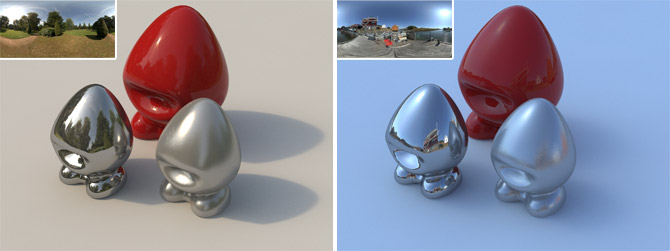
Here's a comparison of a scene rendered with the 2 HDRI maps we already compared before:
It is very obvious that both images look completely different... They should look quite similar since they are both shot on a sunny day. You immediately notice three things:
- Lighting color
- Shadow sharpness
- Reflection strength
|
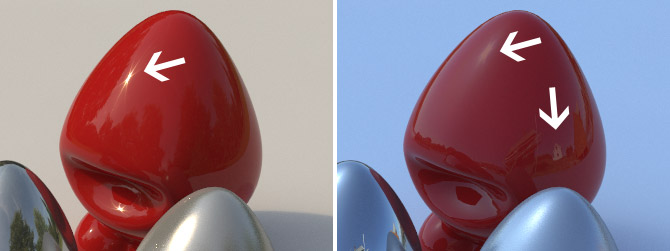
Reflection strength
The red material is a not very reflective plastic. As you can see on the left, the sun is still strong in reflections, since it is such a bright light source. The rest of the environment is reflecting quite dark, like it should. You can also see that the sky reflects more into the object than the trees and grass. This is normal since the sky is a lot brighter than the trees etc...
In the image on the right, you will see that the balance in reflections is completely wrong. The white house appears even brighter in the reflections than the sun! That can't be right... This rendered image looks more like renderings from 10 years ago, where Low Dynamic Range images were used as reflection environments.
|
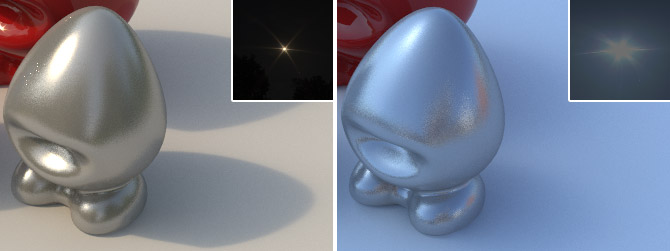
Shadow sharpness
How sharp your shadows appear, is directly related to the size of the light source. In these HDRI maps, the sun is the main light source. The image on the left features sharp shadows, because you can see that the brightest pixels in the hdri cover only a very small point.
In the right image, the sun is a lot larger, there are no brighter pixels in the middle of the star shape. So all of these pixels have a big effect on the overall lighting. The mild shadows appear very soft, because of this large sun. Then also the shadows are barely visible, because there is almost no difference in intensity between the sun and the sky. So the balance of lighting gets completely messed up.
|
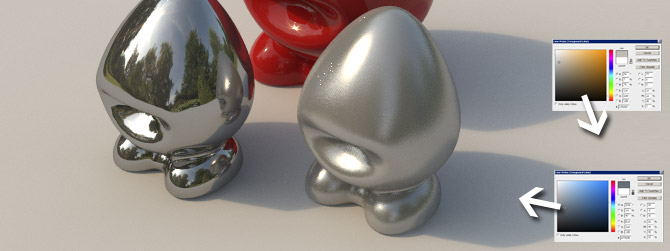
Lighting color
Also because of this messed up lighting balance, the right image appears so blue!
Normally you would have a yellowish very very bright small sun, and a very big (but less intense) blue sky. So the sky tries to make the lighting blue, but it is overpowered by the very bright yellow in the sun. These two balance each other out which results in an image where the sunlit areas are slightly yellow, and the sky lit areas are slightly blue (shadow zones).
Below I have selected a pixel in two areas: directly lit by sun and a shadow area. You clearly see that the shadows are slightly blue, and the sunlit areas slightly yellow.
|
Examine preview renders
If you want to know the true dynamic range of a HDRI map before buying it, you can easily spot it from looking at the preview images rendered with it. If it's a sunny scene, you shouldn't see a totally blue image, with very soft shadows. Same goes for interiors, check out the light placement (spotlights, big windows, etc...) and examine the preview render to see if the reflections and shadows match.
Hopefully this article will help you spot bad quality HDRI maps in the future so you don't end up spending money on crappy ones. Here's a small summary of points that should need your attention:
- Dynamic range: examine preview renders.
- Is the map useful for your renderings?
- Variation in HDRI bundles or collections.
- Contrast and light.
- Resolution vs sharpness.
- Image quality.
- Vertical lines.
|
|
| Back to Vray tutorials page |
| |
 |
|