What are HDRI maps?
 HDRI is short for High Dynamic Range Image. It's a special kind of image that contains much more color info than normal images (low dynamic range images). They are created by combining several pictures of the same scene, with different exposures. With special equipment, 360° HDR panorama's can be created. These are especially useful for 3D visualization as they actually capture the real world lighting of the entire environment. HDRI is short for High Dynamic Range Image. It's a special kind of image that contains much more color info than normal images (low dynamic range images). They are created by combining several pictures of the same scene, with different exposures. With special equipment, 360° HDR panorama's can be created. These are especially useful for 3D visualization as they actually capture the real world lighting of the entire environment.
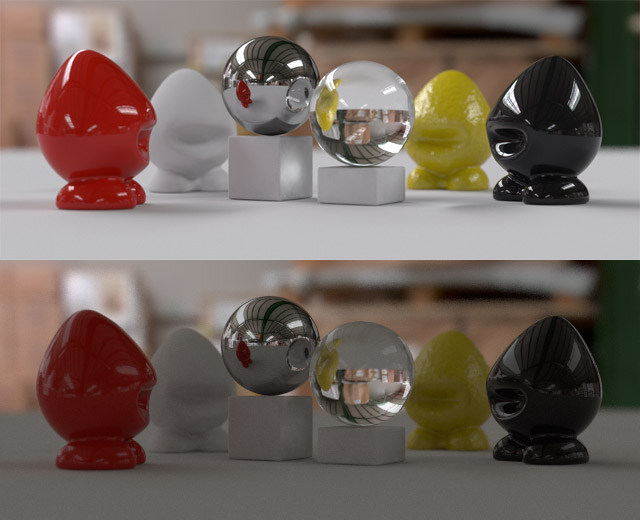
These panoramic HDR images can be used in 3D programs to act as a light source to illuminate your scene, creating very natural lighting effects. They also provide much more realistic reflections compared to LDR images used as reflection maps. On the right is a comparison, the same scene lit with a HDRI (top) and a LDR image (bottom). Notice the difference in shadows, and also the dull reflections on the plastic and glass material.
|
There are many (free) hdri maps on the internet, why should I buy the Aversis HDRI maps?
There are many reasons:
The Aversis HDR images are extremely high quality and very low priced, compared to many packages available on the net. Here are a few facts about the Aversis HDR images:
- Very High Dynamic Range
Many HDRI's fail to capture a very wide range of light. You can easily see this when opening the HDRI in Photoshop or HDR Shop, and lowering the exposure of the map. The brightest areas should stay bright even when the darker regions already turn to black. Especially when the sun is involved, you should see a tiny spot of light in a completely black image. Many HDRI's however have their brightest areas fading to grey when you lower the exposure. This means that they don't capture the full dynamic range of the scene, which will reflect in poor shadows and less realistic reflections.
Read more on this topic here.
- High Resolution
All the individual hdri maps are 10.000*5.000px equirectangular images, which equals to 50 megapixel! Such image detail even allows you to use the HDRI as a background image, and it is more than enough for highly detailed reflections and very accurate lighting solutions & shadows.
- Perfect Image Quality
Since these maps are not created with a mirrored ball, image quality is very crisp and there are no artifacts caused by photoshop editing while trying to mask out the photographer, or trying to blend different maps together.
- Preview Options
For each HDRI you get a low resolution tonemapped preview of the complete map, and even a panoramic viewing option for the full 360° images. There's also a rendered sample so you can inspect how lighting and reflections will look like on different materials.
- Individual sales
You can buy every 10K hdri image individually, instead of being forced to buy packages. So you can just buy the maps you want and create your own specific collection. However if you want to have even cheaper hdri maps, we also offer some very interesting hdri Discounts in our webshop.
How did you create these hdr images?
Different methods were used to create them. The oldest free hdr images were shot with the help of a mirrored ball. These have the lowest quality since hdri's created this way almost always contain artifacts. You need a very good setup to be able to mask out the photographer and to make sure you cover the full 360° environment. I didn't have a perfect setup however and I didn't bother to mask myself out, so that's why I offer them for free.
The 180° skydomes were shot with a circular fisheye lens pointed straight up. This is the ' quick' way to make hdri's, but they only contain the top half of the environment. Most of the time you don't need the bottom half since it's hidden under the groundplane in your 3d scene anyway (as in the rendered examples in the hdri gallery). Quality is very good because there is no stitching or chrome ball involved.
The 360° spherical images are also shot with a circular fisheye lens, but this time at intervals of 90°. With special software they are stitched together, which results in a perfect 360° environment map, without artifacts, without the photographer in view. Because of the high-end equipment used, a resolution of 10.000*5.000 pixels can be achieved.
What mapping type should I choose in my software?
This can have different names in different software packages... Here's the correct way in V-ray for 3D Studio Max:
-360° spherical hdri's: select "spherical environment"
-180° skydomes: select "spherical environment"
-Free mirrored ball hdri maps: select "mirrored ball"
How should I use these maps in my 3D software?
This is also very different for each package. In general, you can use hdri's for three things: lighting, reflections and background. Usually if you put the map in the general background of your scene, it will be used for lighting and reflections too. Sometimes you can (or you have to) specify the lighting, reflection and background separately. Please consult your programs manual for more info.
If you're using 3dsMax and V-ray, here's a very good tutorial to get you started.
End User License Agreement (EULA) |